Friday, July 30, 2010
HTML Problems
Crazy about Cabbage
Since I did the first two kale recipes with fish, I thought I'd make a vegan recipe today. A close friend of mine from high school is vegan, and when I was out visiting her in Portland, Oregon last month, I snagged this recipe from her. It's a Japanese style dish, udon noodles with shiitake mushrooms in a miso broth. Now in theory, it may sound, and possibly look a lot like the hot and sour soup I made a couple of weeks ago, but the flavors of these two dishes are completely different. The miso broth is much milder and richer than the that of the hot and sour soup.
So when I hit the market, I definitely had a plan. I started off with the kale, which I noticed was not as plentiful as it was at past markets. I price shopped the two stands that were selling it, and found that the second tent was selling it for $2/bunch. A whole dollar cheaper than the other tent. So I bought it there. I was running out of garlic and onions at home, so I picked up a garlic head for a $1, and a medium size red onion, for a little less.


On my way to pick up the mushrooms I noticed a barrel of zucchini that looked larger than my head. I know large vegetables can be enticing, but this isn't a pumpkin patch contest. In ve
 ggies, biggest is not always the best, and I've found that the smaller versions of the zucchini have much more flavor and a better texture. So beware of the 5lb. zucchini.
Just as I was leaving I picked up another New Jersey heirloom tomato and ate it as a snack while I was cooking. I can never get enough of these while they're in season.

As much as I'd like to get all of my ingredients at the farmers market, I know there are some that I'll have to get at an indoor market. Luckily I live in NY where small specialized markets with fresh ingredients abound. I stopped at M2M, the Asian market on 3rd Ave. where I tried, but failed to buy the laksa paste. Luckily this meal was more Japanese, so it was right up their alley. I picked up a package of fresh udon noodles and a tub of shiro miso in the refrigerated case in the back. Make sure you get the fresh udon noodles that are kept refrigerated, not the frozen ones, or the dried ones on the shelf.
Miso, a paste made from fermented soybeans comes in red and white varieties, and is a great base for soups. These are just a few different kinds:
Shiro Miso: This is a white variety with a mild flavor due to its short fermentation process.
Saikyo Miso: This is a sweeter white variety with a high rice content
Aka Miso: This red miso is very salty with a strong flavor due to the long fermentation process.
Awase Miso: This is a mix of both red and white miso paste.
There were about 4 or 5 different types of miso in the case, and the recipe didn't call for a specific kind, so I went with shiro miso since I didn't want to overpower the vegetables with a red miso. Plus I must admit, the red variety is often too strong for me. I got both of these things for about $3.50 each.
Today I purchased:
At the farmers market:
1 medium onion
4 oz. of shiitake mushrooms
1 bunch of kale
1 head of garlic
At M2M Market:
1 600 gram package of udon noodles (this is about a pound and a half)
1 container of shiro miso
1 piece of ginger
Supplemental ingredients I had at home:
Mirin
Soy Sauce
Vegetable oil
Recipe: Udon Noodles with Shiitake Mushrooms and Kale in a Miso Broth
Ingredients
½ lb of fresh udon noodles (about 220 grams)
2 tablespoons vegetable oil
1 medium red onion, sliced into thin half moons
4 ounces shiitake mushrooms, stems trimmed, sliced
3 cloves of garlic, minced
2 teaspoons ginger, minced
2 tablespoons mirin
2 cups water
3 tablespoons miso
4 cups of chopped kale
2 tablespoons soy sauce
Bring a pot of water to a boil. Cook the udon according to the package directions, about 10 mins. When done, drain, and rinse with cool water.
Meanwhile, preheat a large skillet over medium heat. Saute the onion and mushrooms in the oil for 5 to 7 minutes, until the mushrooms are tender and the onions are softened but still have some crunch. Be careful to slice the onions thinly like the recipe calls for. I cut mine too thick, and while still good, it would have been better with thinner half-moons.

Add the garlic and ginger, and sauté for another minute.
Add the mirin, soy sauce, water and miso, and bring to a gentle boil.

Lower the heat to a simmer and add the kale. Toss the mixture around with tongs until the kale has wilted.


Add the noodles and use a pasta spoon or the tongs to stir them into the broth for about 2 minutes. Divide the udon and veggies among bowls and spoon broth over each serving.

I really liked how this recipe turned out. It was very fresh and light, yet the miso gave it a full bodied, complex flavor. It makes about 4 appetizer size bowls like the ones I used, or 2 entree size bowls.

This will be part 1 of a 2 part post. I picked up additional food at the Union Square market today that I'll make for dinner tonight, and blog about later in the week.
Sunday, July 25, 2010
Malaysian Style Chicken Red Curry


I was just looking through some new seasonal recipes, and one for Chicken Laksa caught my eye. Laksa is a type of Malaysian soup that can be made in a coconut curry variety. Traditionally it is served with thick white noodles, but the recipe I saw called for thin rice noodles. Unfortunately, despite the book's statement that Laksa Paste could be found in most major supermarkets and any Asian market, I couldn't find it anywhere. I searched two East Village Asian supermarkets and Whole Foods, so I guess it's more obscure that I thought. I'm sure I'll be able to find it somewhere in NY, but I was pressed for time and so decided to go with Thai red curry paste instead.
I substituted one of the vegetables at the farmers market as well. The recipe called for sugar snap peas, but they're not in season at the moment here. I thought that green beans, which work well in most curries, would be a good replacement. Plus, they were in abundance at the market on Friday. I picked up a half pound of those for $2.50, and a pint of cherry tomatoes for $3.00. Then I swung by the herb section and bought a plump bunch of cilantro, also for $2.50. Cilantro is a pretty polarizing herb. I've found that most people either love it or hate it. I love it, and will put it in any Asian or Mexican dish that I'm making. I feel that when coupled with lime, it gives a really fresh flavor.


I purchased:
At the Farmers Market:
1 pint cherry tomatoes
1 bunch cilantro
1/2 lb of green bush beans
At an Asian Supermarket:
2 cans of coconut milk
1 7 oz package of rice noodles
1 lb of chicken cutlets
1 jar of Thai red curry paste
Supplementary ingredients I had at home:
Chicken Stock
Sriracha
lime
Recipe: Chicken Red Curry (with a Malaysian flair)
Ingredients:
3 cups of coconut milk
3/4 of a cup of chicken stock
3 tablespoons of red curry paste
1 lb of chicken cut into strips or chunks
1 cup of cherry tomatoes
1/2 lb of green beans
7 oz of rice noodles
1 tsp of sriracha
handful of roughly chopped cilantro
In a large sauce pan combine coconut milk and chicken stock, and red curry paste. Bring to a slow boil and then add the chicken. Turn down the heat and let the chicken simmer in the pot for 10 minutes. While this is cooking boil a pot of water.

Add the rice noodles and cook for a minute and a half. The recipe didn't call for this, but I found my noodles to be a little undercooked when they were only cooked with the rest of the dish. Once these are done, add the tomatoes, the green beans, sriracha, and the partially cooked noodles. Simmer for another 2 or 3 minutes. Turn off the heat and add the cilantro. Serve immediately with a wedge of lime.

I found this to be one of the easier recipes I've made. It was very quick and very rewarding. The flavor was a bit too subtle for me so I added the lime and the sriracha which I felt kicked it up a notch. Next time I plan to actually find the laksa paste and compare the two versions. I love red curries, but I am excited to try something new.
Friday, July 23, 2010
It's Hot Outside Sour Soup
I will admit that I showed up rather late in the day, but his was one of the more dismal markets that I've been to in the city. There was only one vendor left, and the produce did not look very mouthwatering. The squash was oversized, the herbs were wilted, and the corn looked like some creature had nibbled on it during the day. The only think that looked interesting were some large green peppers, but the rest of the table deterred me from purchasing any. So nothing was purchased at this market. Instead, I'll share with you another recipe that I made with ingredients from a previous week's farmer's market.


Last week at the Union Square market I had picked up those great spring onions with the red bulbs. I had also picked up some shitake mushrooms. Whenever I think of those two ingredients my favorite soup springs to mind, Hot and Sour. I know you can get it at the local Chinese market for $1.50, but it tastes so much better when you make it at home. It's also one of the easiest recipes I make. I usually make it vegetarian, but I'll provide in
 structions if you want to add pork as well.
For the soup I purchased:
At the Farmers Market:
1/2 lb of shitake mushrooms
1 bunch of scallions
At Whole Foods:
1 package of firm tofu
2 containers (8 cups) of chicken stock
Eggs
Supplemental ingredients I had at home:
Soy sauce
Corn starch
Brown rice vinegar
Chinese black vinegar
Sesame oil
Sriracha
White pepper
Recipe: Chinese Style Hot & Sour Soup
Ingredients:
1/2 package extra-firm tofu , drained
4 tablespoons soy sauce
1 teaspoon toasted sesame oil
3 tablespoons cornstarch , plus an additional 1 1/2 teaspoons
3 tablespoons cold water , plus 1 additional teaspoon
1 large egg
6 cups low-sodium chicken broth
1/2 fresh shiitake mushrooms , stems removed, caps sliced 1/4 inch thick (about 1 cup)
2 tablespoons black Chinese vinegar
2 tablespoons brown rice vinegar
1/2 teaspoon sriracha (amount to taste)
1/2 teaspoon ground white pepper
3 medium scallions , sliced thin
1. Place tofu in pie plate and set heavy plate on top. Weight with 2 heavy cans; let stand at least 15 minutes (tofu should release about 1/2 cup liquid). Whisk 1 tablespoon soy sauce, sesame oil, and 1 teaspoon cornstarch in medium bowl. (If adding pork, cut pork into strips and add to this marinade - let marinade 1/2 hour)
2. Combine 3 tablespoons cornstarch with 3 tablespoons water in small bowl and mix thoroughly; set aside, leaving spoon in bowl. Mix remaining 1/2 teaspoon cornstarch with remaining 1 teaspoon water in small bowl; add egg and beat with fork until combined. Set aside.
3. Bring broth to boil in large saucepan set over medium-high heat. Reduce heat to medium-low; add mushrooms and simmer until mushrooms are just tender, about 5 minutes. (If you'd like, you can experiment with ingredients here. I sometimes add 1/2 cup of woodear mushrooms or a can of bamboo shoots as well.) While broth simmers, dice tofu into 1/2-inch cubes. Add tofu and soy sauce/sesame oil marinade you prepared (and pork if you're using it) to soup. Continue to simmer about 2 minutes. (Simmer until pork is no longer pink if included.)
4. Stir cornstarch mixture to recombine. Add to soup and increase heat to medium-high; cook, stirring occasionally, until soup thickens and turns translucent, about 1 minute. Stir in two types of vinegar, sriracha, pepper, and remaining 3 tablespoons soy sauce; turn off heat. (The black Chinese vinegar can be hard to find. I usually get it at an Asian grocery store on 3rd Ave somewhere around 11th or 12th St., but if you can't find it, just use 4 tablespoons of the brown rice vinegar which can be found at any Whole Foods.)
5. Without stirring soup, use soup-spoon to slowly drizzle very thin streams of egg mixture into pot in circular motion. Let soup sit 1 minute, then return saucepan to medium-high heat. Bring soup to gentle boil, then immediately remove from heat. Gently stir soup once to evenly distribute egg; ladle into bowls and top with freshly chopped scallions.

Sorry for the lack of photos on this one. I took them, but I can't seem to find where they went. This is a last minute photo of a leftover bowl without the scallions, but the green of the scallions gives it a great color contrast, so definitely add them. I love this recipe. I make it all the time during the winter, but I see no reason why it can't be a year round soup. It makes enough for about 6-8 bowls, and I tend to make a big batch and eat it all week on its own or as an appetizer for a larger meal.
Next week I think I'll return to the Union Square market. More variety, and more intriguing ingredients to work with.
Saturday, July 17, 2010
Blue Cheese Burgers
After a morning jog through Prospect Park where I smelled the BBQs as early as 9:30am, I had burgers on the brain. I have a great recipe for a stuffed blue cheese burger that I got from my friend Amy, so I had a shopping list in my head before I even went to
 the market. After the disappointment of the Boro Hall market earlier in the week, I returned to the Grand Army Plaza market today. After spotting two vendors that sell turkey I thought about making a turkey burger, but I was kind of set on beef. There was a nice selection of meat in a case by the side entrance. At $5.00/lb for free range, grass fed beef, I thought it was a good deal, but was not very happy when I discovered it was frozen. The vendor promised me that it would thaw in no time at all, and be just fine, and I didn't see anyone else selling beef at the market, so I bit the bullet and purchased the frozen beef. If you can find it, I highly recommend buying grass fed beef that comes from cows that are allowed to roam. If you buy meat in the supermarket it is most likely corn fed, a grain that cows were not meant to consume, and cause many intestinal issues. I won't go into the dirty details, but if you're curious, check out the film Food Inc.
Next I headed over to a cheese table that had two blues to choose from. A Cato Ransom Blue that had a sharp tang, and a slightly smoother Black Ledge Blue. Both were $19.99/lb. If I were just eating the cheese with bread, I probably would have gone with the Cato. I like a strong blue, but since I was stuffing the burgers with the cheese, I opted for the milder one. I knew I was going to add some flavors to the meat, and didn't want to overwhelm the rest of the burger.


I picked up some lettuce and a tomato, before swinging by the bread stand to grab two kaiser rolls for $.50 each. I'm kind of picky about my tomatoes, especially when they're standing on their own, and they're not a part of a cooked dish. I love heirloo
 m tomatoes, but I always used to be wary of the ones from NJ. I'm from Massachusetts, and there's a farm near my parents' house that has nearly two dozen varieties of heirloom tomatoes during the summer. (http://www.verrillfarm.com/heirloom.html). I couldn't imagine that the Jersey ones were as good and refused to try them for years. A couple of years ago, however, an ex-boyfriend who lives in Jersey used to make me sandwiches with some of the juiciest NJ heirlooms I ever tasted. Since then, I've been a convert. They're a little pricier than the field tomatoes, but worth it.
Today I purchased:
At the farmers market
1 lb of grass fed beef
1/4 lb. of Black Ledge Blue Cheese
1 bunch of rosemary
1 small lettuce
1 NJ heirloom tomato
2 kaiser rolls
Supplementary ingredients I had at home
3 TBS butter
Worcestershire sauce
Garlic
Salt
Pepper
Dijon mustard
Recipe: Beef Burgers Stuffed with Blue Cheese (makes 2 large burgers)
I defrosted the meat (still in it's air tight package) in a bowl of cold water for about an hour. Now some people are meat purists. They feel that if it's quality meat, it should be able to stand on its own. I agree with that, but I don't see the harm in adding something a little extra to draw out the best possible fl
 avor of the meat. I like to season my meat with salt and pepper. Then I throw in a little minced garlic, a little bit of Worcestershire sauce, and a couple of teaspoons of Dijon mustard. Today, I also chopped up a little rosemary and added it to the beef. Once mixed together by hand, I separated the pound of meat into 4 quarters, and made each into a reasonably flat patty. Next I took some small pieces of the blue cheese and put them in the center of two of the patties. It's up to you how much blue cheese to use, but make sure it stays closer to the center otherwise it will ooze out the sides while cooking. Once the blue cheese was on the patty, I took the other patty and covered the first one up, locking the blue cheese in the center between the two patties. I pressed the edges together to make sure the cheese wouldn't escape.
Last summer, Amy had heard of a great idea on the radio. A program had talked about basting the burgers in melted butter, Worcestershire, and rosemary. I melted about 3 TBS of butter, 2 TBS of Worcestershire, and threw in a sprig of rosemary. Then I took another sprig of rosemary, dipped it into the sauce, and basted each burger with it. If you're using an outdoor grill, you can tie the sprig to the end of a wooden spoon so that you don't burn yourself.

If you're using an indoor grill pan like me, set the heat to high, and let the pan warm up for a bit. Put the burgers on the hot grill. Cook for 4 -5 minutes on each side. This will produce medium burgers. When you flip the burgers half way through cooking, baste again with the butter/Worcestershire mixture.
I had my burger with a slice of the tomato, lettuce, and some mustard, but you can have your with your favorite condiments.

Thursday, July 15, 2010
Kale Take Two
 weeks ago showed you how to make a fish dish on a bed of sauteed kale. Today, I thought I'd show you another way to use the bitter green...in a pesto.
Pesto, a bright green sauce hailing from the Genovese region of Italy, is usually made with basil. I first tried it on a trip to the region over a decade ago, and I must admit, it's never tasted quite the same since. Basil is plentiful in the summer, but it can often be hard to find fresh basil in the winter. The recipe I'm going to make today was originally made with winter kale, so use that when it's in season, but I thought I'd try it with the summer variety. The kale gives it a milder, but also slightly more bitter flavor that I think works well with a sweet mollusk like scallops.


Today I thought I'd branch out and try a farmers market I'd never been to before. I wanted to stay in Brooklyn so my choices were the Williamsburg market on Havemeyer and Broadway, and the Boro Hall market on Court and Montague. I hear the Williamsburg market is great if you're cooking any type of Latino food, as it has a wide variety of peppers. But it's much easier for me to get to downtown Brooklyn from Prospect Heights, and this meal is lacking any spicy flavors, so I thought I'd try that one today.
I have to admit I found the market underwhelming. There were only two or three vegetable stands, a bread stand, and a cheese table. When I asked the bread woman if it was an especially small day, she laughed and said this was big for Boro Hall. In the winter there are only two stands.
I found the lack of variety especially vexing since I already had a dish in mind, and it included scallops. I could have drizzled the pesto over pasta like I had it in Italy, but a reader commented the other day that her husband has celiac's disease (an auto-immune disease where the lining of the colon gets broken down by gluten found in wheat, barley, and rye) and was always looking for recipes that didn't use any gluten. I took it as a challenge for the week, after making pizza and muffins last week, and decided to only use veggies and a protein. I had even looked up the market online at www.cenyc.org/greenmarket to make sure there would be a fish stand. The site listed one, but there was definitely not one there, so be aware that all of the vendors listed on the site might not be present on any given day. As a result, I was forced to walk to a local fish store on 7th ave. in Park Slope on my way home. I picked up 6 sea scallops (the large ones, bay scallops are the tiny ones) for $1/scallop. This would be enough for 1 main course or two appetizers.
While still at the market, I bought a large bunch of kale for $2.75/bunch. I wasn't sure what I wanted to use as a side until I spotted those avocado squash that I had seen, but passed by at the Union Square market last week. They were nestled next to s
 ome vibrant light purple eggplant for $1.50/lb. I picked up one of each, and headed off to the fish market before returning home to cook.
I purchased the following:
At the Farmers Market
1 bunch of kale
1 avocado squash
1 small light purple eggplant
At the Fish Store
6 Sea Scallops
Supplementary Ingredients I Had at Home
Olive Oil
Sea Salt
Pepper
Unsalted Butter
Parmesan
Roasted Almond Slices
Garlic (originally from the farmers market)
Shallot (originally from the farmers market)
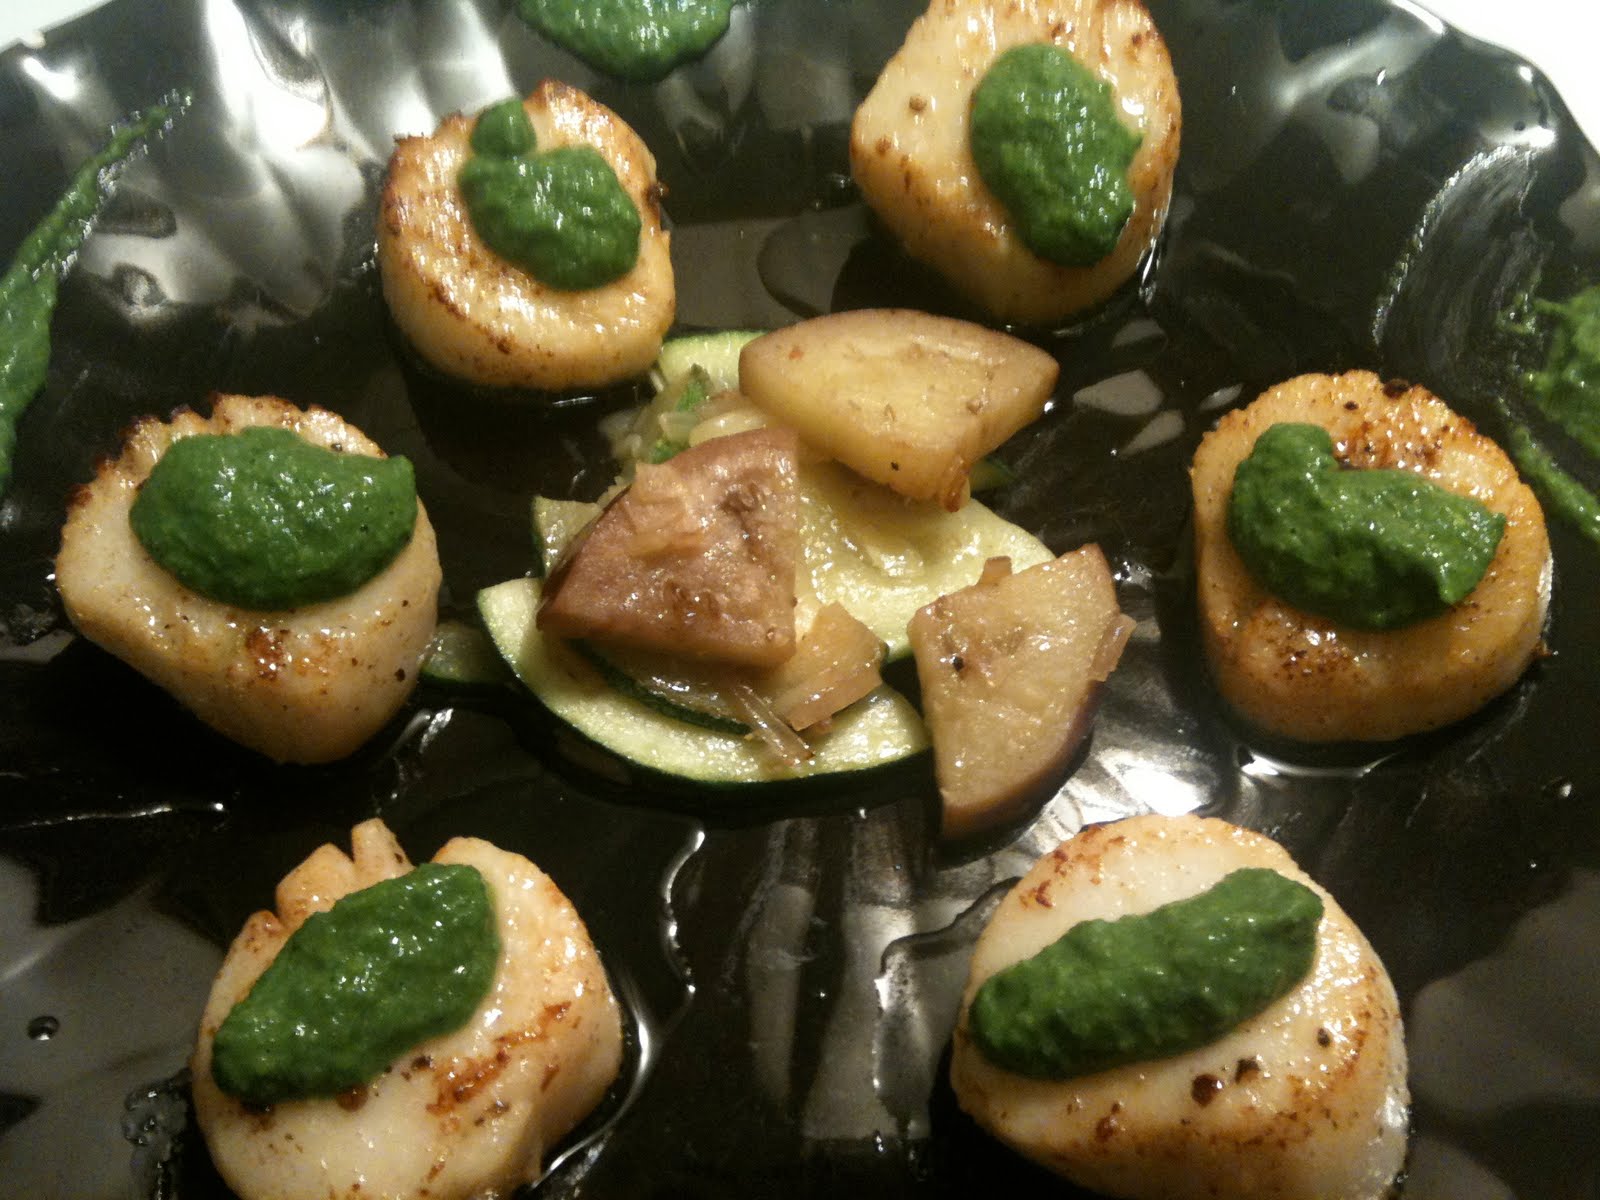
Recipe: Seared Sea Scallops with Kale Pesto and Sauteed Vegetables
For the Pesto:
4 cups of kale densely packed, taken off of the ribs
1/2 cup of olive oil
1 large garlic clove
1/4 teaspoon of salt
1/2 cup of Parmesan
1/2 Tablespoon of roasted almond slices
Blanch the kale in boiling water for 6 minutes. Drain in a colander and remove as much of the excess water as possible. Put garlic clove and salt in a blender or food processor and process until minced. Add kale and olive oil and process until blended. Add Parmesan and process until blended. Add nuts and pulse until chopped and mixed in. (Side note: Pesto usually calls for pine nuts, but they're quite an expensive nut, and I've found that a lot of other nuts are just as good. This was my first time using almonds, but I didn't think it changed the flavor too much.)
For the sauteed vegetables:
1 avocado squash sliced into rounds and quartered
1/2 eggplant sliced into rounds and quartered

1 tablespoon olive oil
1 garlic clove minced
1 shallot chopped
salt
pepper
Saute all ingredients on medium high until eggplant and squash begin to soften but not fall apart. Remove from heat and reserve. I have to say that these were my favorite part of the dish. The squash had this lovely buttery quality that I couldn't get enough of, and the eggplant was the perfect accompanying texture. So simple, yet so good.
For the Scallops:
6 Sea Scallops
2 tablespoons olive oil
2 tablespoons unsalted butter
salt
pepper
Wash scallops and pat dry. Lightly salt and pepper scallops. Heat butter and olive oil on high heat. When it begins to smoke, add the scallops. Cook the scallops 1 1/2 minutes on each side, until lightly browned crust forms. Remove from heat.
To serve:
I placed the sauteed veggies in the middle of the plate, surrounded them with the scallops, and spooned a dollop of the pesto on top of each. Feel free to get creative with your plating.

I love pesto because there are lots of different ways you can make it. I made a vegan pesto a few weeks ago with a friend in Portland, OR. We used traditional basil, but instead of using cheese, we used ground pecans. It gave it a much richer flavor. I hope you'll experiment with different market greens in your pesto, and let me know what works for you.
Sunday, July 11, 2010
Morning Muffins
So yesterday when I went to the Grand Army Plaza farmers market, I had muffins on my mind. My brother was bringing his wife and child for an impromptu visit, and he requested muffins upon arrival. I hit the market early so there would be a good selection of fruit to choose from. I like to mix more than one fruit in my muffins. I think if you have multiple fruits with more than one level of
 sweetness and juiciness level, it creates a nice contrast.
Upon arrival, I realized right away that one of the ingredients would be peaches. They were all over the market in different varieties: Yellow peaches, white peaches, nectarines. I chose local Jersey tree-ripened peaches, which were a good deal at $2.80/lb.

I ended up picking the raspberries and was off, but not before spotting some Jersey corn a
 t $.75/ear that I ate for dinner last night.
I purchased the following:
At the Farmers Market
1/2 pint of raspberries
2 Jersey tree-ripened peaches
2 ears of corn (not for the muffins)
Super Market Ingredients
1 lemon (we're not in California or Florida, so there was a definite lack of citrus as the market)
Supplemental Ingredients I Had at Home
Flour
Sugar
Eggs
Vanilla Extract
Sweet Cream Butter
Baking Powder
Milk
Recipe: Raspberry Peach Muffins (from "500 Cupcakes" by Fergal Connolly)
1/2 cup of superfine sugar
1 TBSP grated lemon zest
2 1/2 cups of all purpose flour
1 TBSP of baking powder
2 eggs lightly beaten
1 cup of milk
1 stick of butter (melted)
1 tsp vanilla extract
1 cup of raspberries
1 cup of chopped peaches
Preheat the oven to 400 degrees and spray muffin pan with non-stick spray
In medium bowl mix flour, sugar, lemon zest, and baking powder. In a large bowl beat the eggs, butter, milk, and vanilla with an electric mixer for a minute. I have an electric mixer that I really like, and I feel like it's a good investment, but if you don't have one you can use a wire whisk for a couple of minutes. Pour in the dry ingredients. Mix until the flour is almost completely mixed in, but not quite. Fold in the fruit and mix until it's incorporated. Spoon the batter into the cups. The recipe says to bake the muffins for 20 minutes, but this depends on the oven. I baked mine for 18 and they were golden brown, but still moist. Let sit for 5 minutes after pulling them out of the oven, then move them to a cooling rack.
 I guarantee that most people will love them...except my 1 1/2 year old niece who picked the peaches out and fed the rest to the pigeons. Happy baking.
Wednesday, July 7, 2010
Mid Summer Pizza
rat
 her a purplish maroon color. The tops can grow much larger then the normal "white" spring onion variety, and the taste is slightly sweeter. I bought some, but decided to save them for another dish.
Today's dish is pizza. I spotted a roasted vegetable frozen pizza while strolling the aisles at Trader Joe's the other day and decided that it would be better if I made it myself. So today's goal was to find bright and fresh ingredients that would look and taste good on top of a pizza. After browsing the whole market it became evident that it's really squash season. Each stand overflowed with zucchini, yellow squash, even an avocado squash which I had never heard of before, but after some research discovered that the roundish green vegetable has a slightly richer flavor than regular squash. I made a mental note to try that later and bought some zucchini and yellow squash instead. The color of the yellow squash was so vibrant, I knew it would stand out on top of the pizza.


After grabbing some early season Jersey tomatoes I headed to the south side of the square to Whole Foods to buy some supplemental ingredients. I unfortunately didn't have enough time today to make the dough for the pizza myself, but Whole Foods makes a great alternative. They make it fresh every day in a few different varieties. You can find it in the refrigerated section with the sandwiches. I also picked up some locally made mozzarella. I would have liked to have bought cheese at the farmers market, but I wasn't too impressed with the selection they had today. There were only a couple of cheese vendors, and nothing but goat cheese seemed appropriate for a pizza. I would have bought that, but the vegetables seemed so fresh that I didn't want to overpower their flavor with the pungency of the goat cheese.
So today I purchased:
Farmers Market
1 yellow squash
1 zucchini
2 Jersey tomatoes
1 bunch of thyme
1 shallot
1 yellow onion
Whole Foods
1 pre-made pizza dough
1 ball of mozzarella cheese
Ingredients I had at home
white wine
olive oil
salt and pepper
sugar
Parmesan
Recipe: Roasted Tomato and Squash Pizza
Slice the squash into rounds. Chop the tomatoes into quarter size pieces. Mince two cloves of garlic and the onion. In medium size skillet saute the onion and garlic on medium high heat for a minute. Add the tomatoes, squash and zucchini. Saute on medium high until the zucchini starts to slightly brown and get soft. Add salt and pepper to taste and a teaspoon of thyme. I had actually bought the thyme at the Grand Army Plaza farmers market earlier in the week and had left it out in a bowl. When I went to use it today it was already dried. This was fine. It just meant that I used a little less. As the tomatoes started to cook down I added a splash of white wine and a teaspoon of sugar. Once the tomatoes were losing their shape, but before the squash fell apart I turned off the heat. It should look like this.


While I was sauteing the vegetables I preheated the oven to 450 degrees. I would prefer to use a pizza stone, but if you don't have one, a sheet pan will do. Spray the pan with olive oil so it won't stick. Roll out the pizza dough to desired thickness. Prick the dough with a fork so it doesn't bubble up during baking. I brushed some olive oil over the dough before adding the toppings.
You can put either the cheese or the vegetables on first, but I put the cheese as the under-layer. I sliced the mozzarella to about 1/4 inch and laid it on the pizza. Then I scooped the vegetables on top of the cheese and finished with some Parmesan I had in the fridge. Bake for 10 minutes until the crust is crispy but
 not burnt. Remove from the oven and let sit for 10 minutes before serving.
Saturday, July 3, 2010
Summer Fruit Done Savory

Today my friend Sarah and I hit the Grand Army Plaza farmers market. I was pleasantly surprised with what I saw, since it seemed to be larger than I remembered it being from last time I was there. I was immediately drawn to the fruit, fuzzy white peaches, plump raspberries, and juicy blueberries. I thought about making muffins, but I couldn't seem to find my trusted muffin recipe when I looked this morning, so decided I'd leave the baking for later in the month. As I was looking for an accompaniment for the raspberries and strawberries I came across late season rhubarb. It was in a meager pile at one of the meat vendors, but I snapped some up anyway. I've used rhubarb quite a bit, but always in desserts. Just as I was running through compote and cris
 p recipes in my head, my friend suggested making a savory dish with the rhubarb instead. I liked that immediately, and from that came the recipe below.
This recipe was loosely based on a salmon recipe I got off of Epicurious that had the salmon sitting on a bed of cabbage stewed in the rhubarb liquid. I don't like my food to be too sweet so I substituted the stewed cabbage with kale I had bought at the market, and fried it in bacon fat, but I'll get to that later. I'm also not a huge cooked salmon fan, and I saw some lovely mahi mahi so I used that instead.
What you'll need:
2 oranges juiced
1 lemon
1 teaspoon mustard
2 teaspoons of coriander
1/4 cup of water
1/2 cup sugar
1/2 tablespoon of minced fresh ginger
1 1/2 cups of rhubarb cut into 2 inch pieces and sliced lengthwise
3 mahi mahi filets
4 cups of kale
3 strips of bacon
salt
pepper
olive oil
1/2 cup of Greek yogurt
dill
Bring orange juice, sugar, water, and orange peel to boil in medium size pot, stirring until sugar dissolves. Reduce heat to medium; add mustard, coriander, and ginger. Simmer until syrupy, 10 minutes. Add rhubarb; reduce heat to medium-low. Cover and simmer until rhubarb is tender but intact, 2 minutes. Using slotted spoon, transfer rhubarb to a bowl; reserve.
In the meantime, preheat oven to 350 degrees. Rub the fish with olive oil, salt and pepper. After you've removed the rhubarb and before you put the fish in the oven, lightly brush the fish with the reduced syrup. Bake fish for 5 minutes remove from oven, flip over, brush with syrup again, and cook for another 5 minutes.
Now to the kale. I love kale, I'll eat it raw, but when it's cooked it can often be flavorless if you don't cook it correctly. I like to saute mine in bacon fat (also a recommendation years ago from Sarah). I started by cooking three pieces of bacon in a skillet, then once I removed the bacon I threw the kale in on medium/high heat. I sauteed the kale for a couple of minutes keeping it moving with tongs, then added salt and pepper. Once it started to turn a brighter green I added a few tablespoons of orange juice to the pan, covered it, and let it steam for a minute. I actually found that the kale was too sweet for me with the orange juice, but I feel it would be perfect if I used lemon juice instead...but that's personal preference. After a minute I removed the cover and turned off the heat.
I placed the kale in the center of the plate (sprinkled with a few pieces of crumbled up bacon because who can resist bacon), and a piece of the fish on top. The original Epicurious recipe called for a dollop of Greek yogurt on top. I had found some dill at the farmers market that I was dying to use, so I added a little to the yogurt which actually made me really happy. A dollop of that went on top of the fish, then I spooned some of the rhubarb on top of that.
I was actually quite pleased with this recipe. While cooking it I was afraid it would be too sweet for me, but the mixture of the salty kale and the sweet rhubarb really worked, especially when it was mixed with the yogurt. I'm looking forward to another trip to the market later this week, there were some really lovely yellow and green squash that I think would be perfect on top of a pizza.